You spot a damp patch on your ceiling or a drip in the attic, and your heart sinks. A leaky roof means trouble. It could be a tiny crack or something hiding underneath—for all you know, mold or rot may already be quietly spreading. You worry about water damaging your walls, insulation, or framing. You want it fixed, fast, and right before the problem grows.
We get that. We’ve helped homeowners all across San Diego County find and fix leaky roofs before things get worse. Roof leaks are stress-inducing, but with the right approach, they don’t have to end in disaster.
In this guide, you’ll learn:
- What usually causes leaks
- How to look for and find the source
- Simple fixes you can do yourself
- When to call in professional help
- Tips for stopping leaks before they start again
Let’s walk you through the steps and help you fix that leaky roof for good.
Why Leaks Happen in the First Place
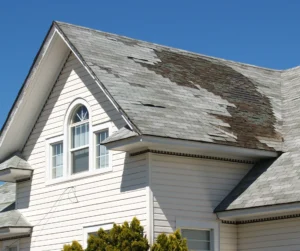
1. Damaged or missing shingles
2. Broken flashing
3. Cracked vent pipe seals
4. Clogged gutters
5. Sunken valleys
6. Attic condensation
Sometimes there’s no roof hole at all—it’s moisture building up in your attic from warm air meeting cold surfaces.
Knowing what causes leaks is the first step to knowing how to fix a leaky roof.
Step 1: Find the Leak at Its Source
Start in the Attic: Your First Clue
Begin your investigation in the attic, the closest vantage point to the roof’s underside. Arm yourself with a powerful flashlight. Methodically scan the entire attic space, paying close attention to the underside of the roof deck, rafters, and insulation. You’re looking for several tell-tale signs:
- Water Stains: These can appear as discolored patches, often yellowish or brownish, indicating past water intrusion.
- Wet Spots: Any area that feels damp to the touch or appears darker than the surrounding material is a strong indicator of an active or recent leak.
- Mold or Mildew Growth: The presence of mold or mildew, often appearing as black, green, or white fuzzy patches, signifies prolonged moisture issues.
- Puddles or Drips: In severe cases, you might even find active drips or small puddles on the attic floor.
Trace the Path: Following the Water's Journey
Water rarely drips directly down from the point of entry on the roof. Instead, it tends to follow the path of least resistance. From the initial signs you found in the attic, carefully trace the water’s path. Leaks commonly run along:
- Rafters: The wooden beams supporting the roof can act as channels for water.
- Insulation: Water can soak into insulation, spreading horizontally before dripping down.
- Pipes or Ducts: Any penetrations through the roof for plumbing vents, HVAC ducts, or chimneys can provide a pathway for water to travel along.
Follow these trails upwards and outwards, as they often lead you closer to the actual entry point on the roof’s exterior.
Inspect the Roof's Exterior: The Source of the Problem
Once you have a general idea of the leak’s location from your attic inspection, it’s time to examine the roof itself. This step requires caution and proper safety equipment. Look for the following common culprits:
- Missing or Damaged Shingles: High winds, age, or improper installation can cause shingles to become dislodged, cracked, or curled, creating openings for water.
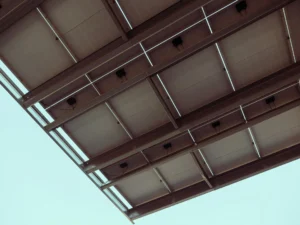
- Damaged Flashing: Flashing are thin pieces of metal (or sometimes plastic) installed around chimneys, skylights, vents, and valleys to create a watertight seal. If flashing is bent, cracked, rusted, or improperly installed, it’s a common source of leaks.
- Cracked Pipe Seals: Plumbing vent pipes and other roof penetrations are typically sealed with rubber or plastic boots. Over time, these seals can crack, deteriorate, or become dislodged, allowing water to seep in.
- Clogged or Damaged Gutters/Downspouts: While not directly on the roof, overflowing gutters can cause water to back up under shingles, especially during heavy rains.
- Moss, Algae, or Debris Buildup in Valleys: Roof valleys are areas where two roof planes meet. Accumulation of leaves, twigs, moss, or algae in these areas can trap water and prevent proper drainage, leading to leaks.
The Hose Test: Confirming the Leak's Location
If the leak’s source isn’t immediately obvious after your visual inspections, a hose test can be an invaluable tool. This should be done on a dry day to avoid confusion with existing rain.
- Team Up: Have one person on the roof with a garden hose and another person inside the attic (or directly below the suspected leak area) to watch for drips.
- Systematic Spraying: Start by spraying water on the lowest suspected area of the roof. Work your way upwards, systematically soaking small sections for several minutes before moving to the next.
- Patience is Key: It can take time for water to penetrate and show up inside, so be patient. If you’ve been spraying one area for a while and see no drips, move to the next section.
- Simulate Rain: Focus on areas like valleys, flashing, vents, and any areas where you suspect damage. The goal is to simulate rainfall over specific sections to observe if and when water appears inside.
Once you have meticulously followed these steps and successfully identified the exact source of the leak, you will be well-equipped to undertake the necessary repairs and protect your home from further water damage.
Step 2: Simple Fixes You Can Do Yourself
Replace or repair shingles
Seal flashing
Replace vent pipe boots
Clear gutters and valleys
Improve attic airflow
Install baffles or vents to reduce moisture buildup that can mimic leaks.
These fixes can buy you time, especially before a storm.
Step 3: When to Call a Professional
Some leaks need more than a patch, and missing this can cost you thousands down the road. Call our team at Ground Up Construction when:
- The damage spreads across multiple shingles or connectors
- You don’t feel safe climbing onto the roof
- The leak has damaged wood decking or attic insulation
- You suspect hidden damage under the shingles
- You want expert guidance and guaranteed repairs
A professional inspection can save you from bigger repairs later.
Step 4: Full Leak Repair by Pros
Inspection and diagnosis
Estimate and options
Roof repair work
Cleanup and final check
Step 5: Preventing Future Leaks
Annual roof inspections
Clean gutters and valleys
Replace worn rubber boots
Improve attic insulation
Add flashing upgrades
Why Ground Up Construction Is the Local Choice
- We’re a licensed, insured local company focused on roof leak repair.
- We’re honest about what you actually need—no upselling.
- Communication is key: you’ll get updates, before-and-after photos, and clear invoices.
- We offer warranties on our work and use materials built for San Diego weather.
What You’ll Have Once We’re Done
- A stable, reliable roof with no leaks
- Dried and healthier attic space
- Flashing and boots sealed correctly
- A team you can trust for future home projects
Your Next Step if You Have a Leak
- Contact us
- We’ll schedule a quick inspection
- We walk on your roof, diagnose the leak, and give you clear options
- We complete needed repairs with care and precision
- You relax knowing your roof is solid
Contact Ground Up Construction and let us help you fix that leaky roof before it becomes a bigger problem.